Historical Sync

Introduction
Byteline Data Sync efficiently synchronizes existing data in both apps so that you can keep valuable data. This process is called historical sync. The process involves getting existing data from both apps and then updating, creating and deleting records to make the data in sync.
For 2-Way sync, records can be updated on both apps. However, for 1-Way sync, records are updated only on the target app.
Understanding Matching Keys in Data Sync
When you're syncing data between two different apps using Byteline's Data Sync, you want to make sure that the information is matched up correctly. This is where matching keys come into play. Don't worry if you're not a tech expert—this guide will break it down for you in simple terms.
What Are Matching Keys?
Think of matching keys as special identifiers for your data. Imagine you have two lists—one from App A and one from App B—and each list contains names and email addresses. A matching key could be something like an email address because it’s a piece of information that is unique to each person on your list. No two people should have the same email address, right? So, this unique piece of information helps Byteline figure out who’s who when syncing the data between your two apps.
Matching keys might sound technical, but they’re really just a simple way to make sure your data stays accurate when syncing between apps. By using matching keys, Byteline ensures that your information is always matched up correctly, saving you time and hassle.
Why Are Matching Keys Important?
When you’re syncing data, you might have records in both App A and App B that need to be matched up. If you don’t use matching keys, Byteline won’t know how to correctly pair the records from one app to another. Matching keys ensure that the information for "John Doe" in App A matches up with the information for "John Doe" in App B, even if the two apps store the data slightly differently.
How Do Matching Keys Work?
- Matching Key Selection:
- Automatic (default): Byteline automatically determines the matching keys based on your data. This default approach works for most of the sync configuration. However, for fine control over the historical sync process, you can manually select the matching keys.
- Manual: For greater control over the historical sync process, you can manually select matching keys. The first step in the manual selection is to decide what your matching key will be. In many cases, it’s something straightforward like an email address or a customer ID. You’ll pick this key when setting up your data sync for the first time. See the Manually Configuring Matching Key(s) section below for the details.
- Historical Sync: When you run your sync for the first time, Byteline looks at the matching keys you’ve chosen to match up existing records between your two apps. This process is called a historical sync, meaning it’s looking at data that’s already there, not just new data.Matching keys are only considered for the historical sync, i.e., to sync existing data. Once a sync is active, matching keys are not checked.
Manually Configuring Matching Key(s)
To manually select matching keys for real-time sync:
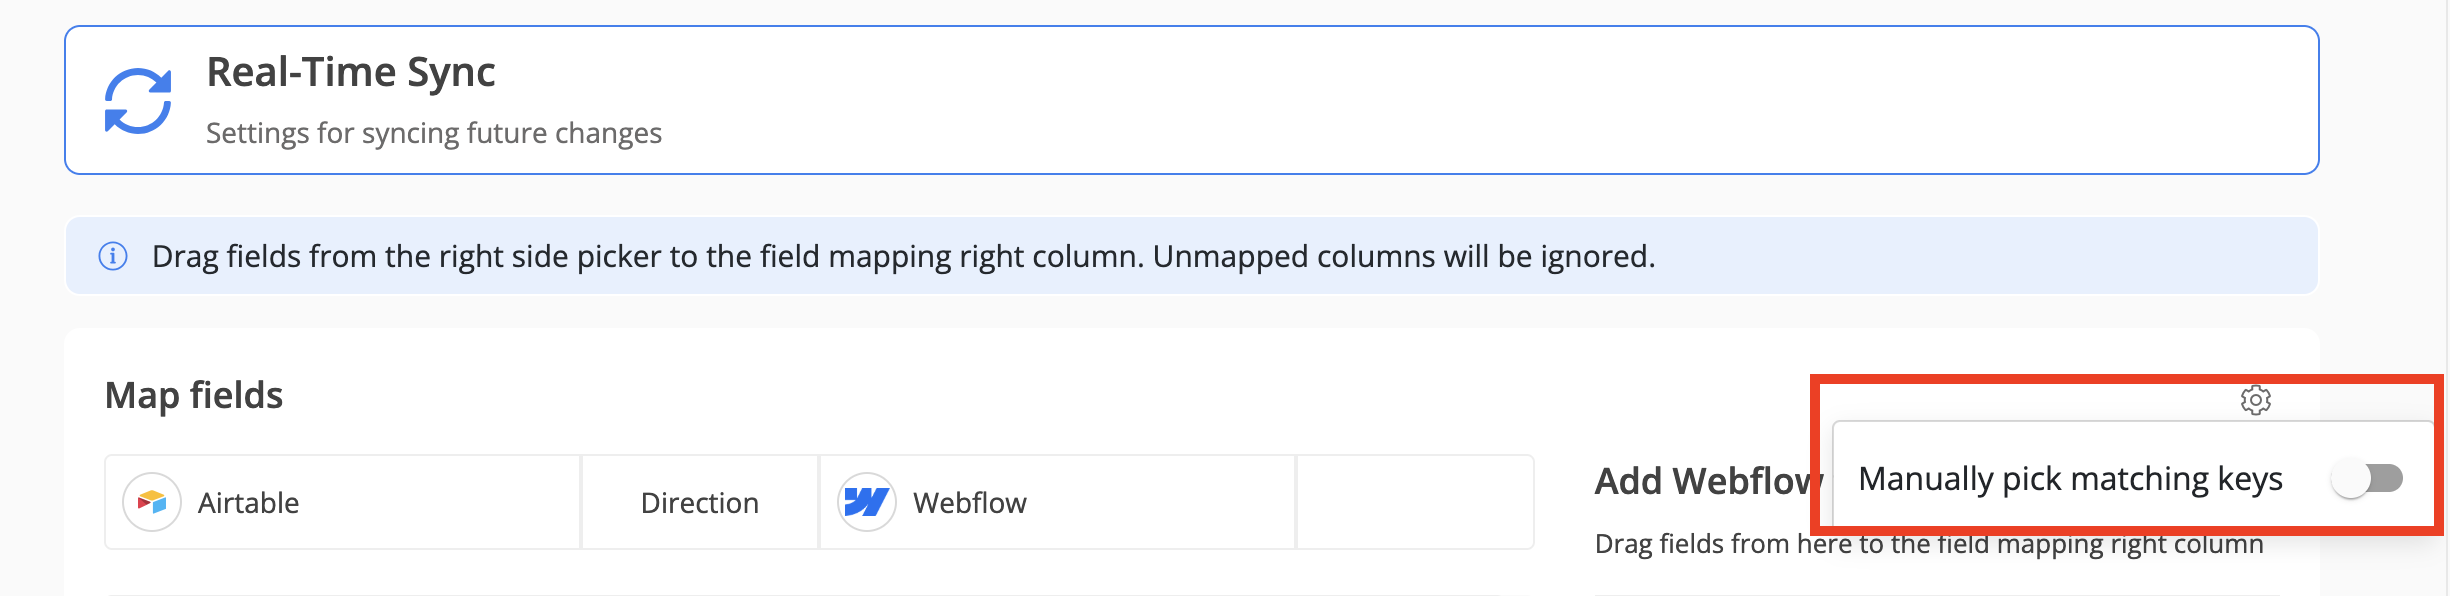
- During configuring real-time sync, you need to toggle the option to manually choose the unique key(s). Below is the screenshot for enabling this setting.
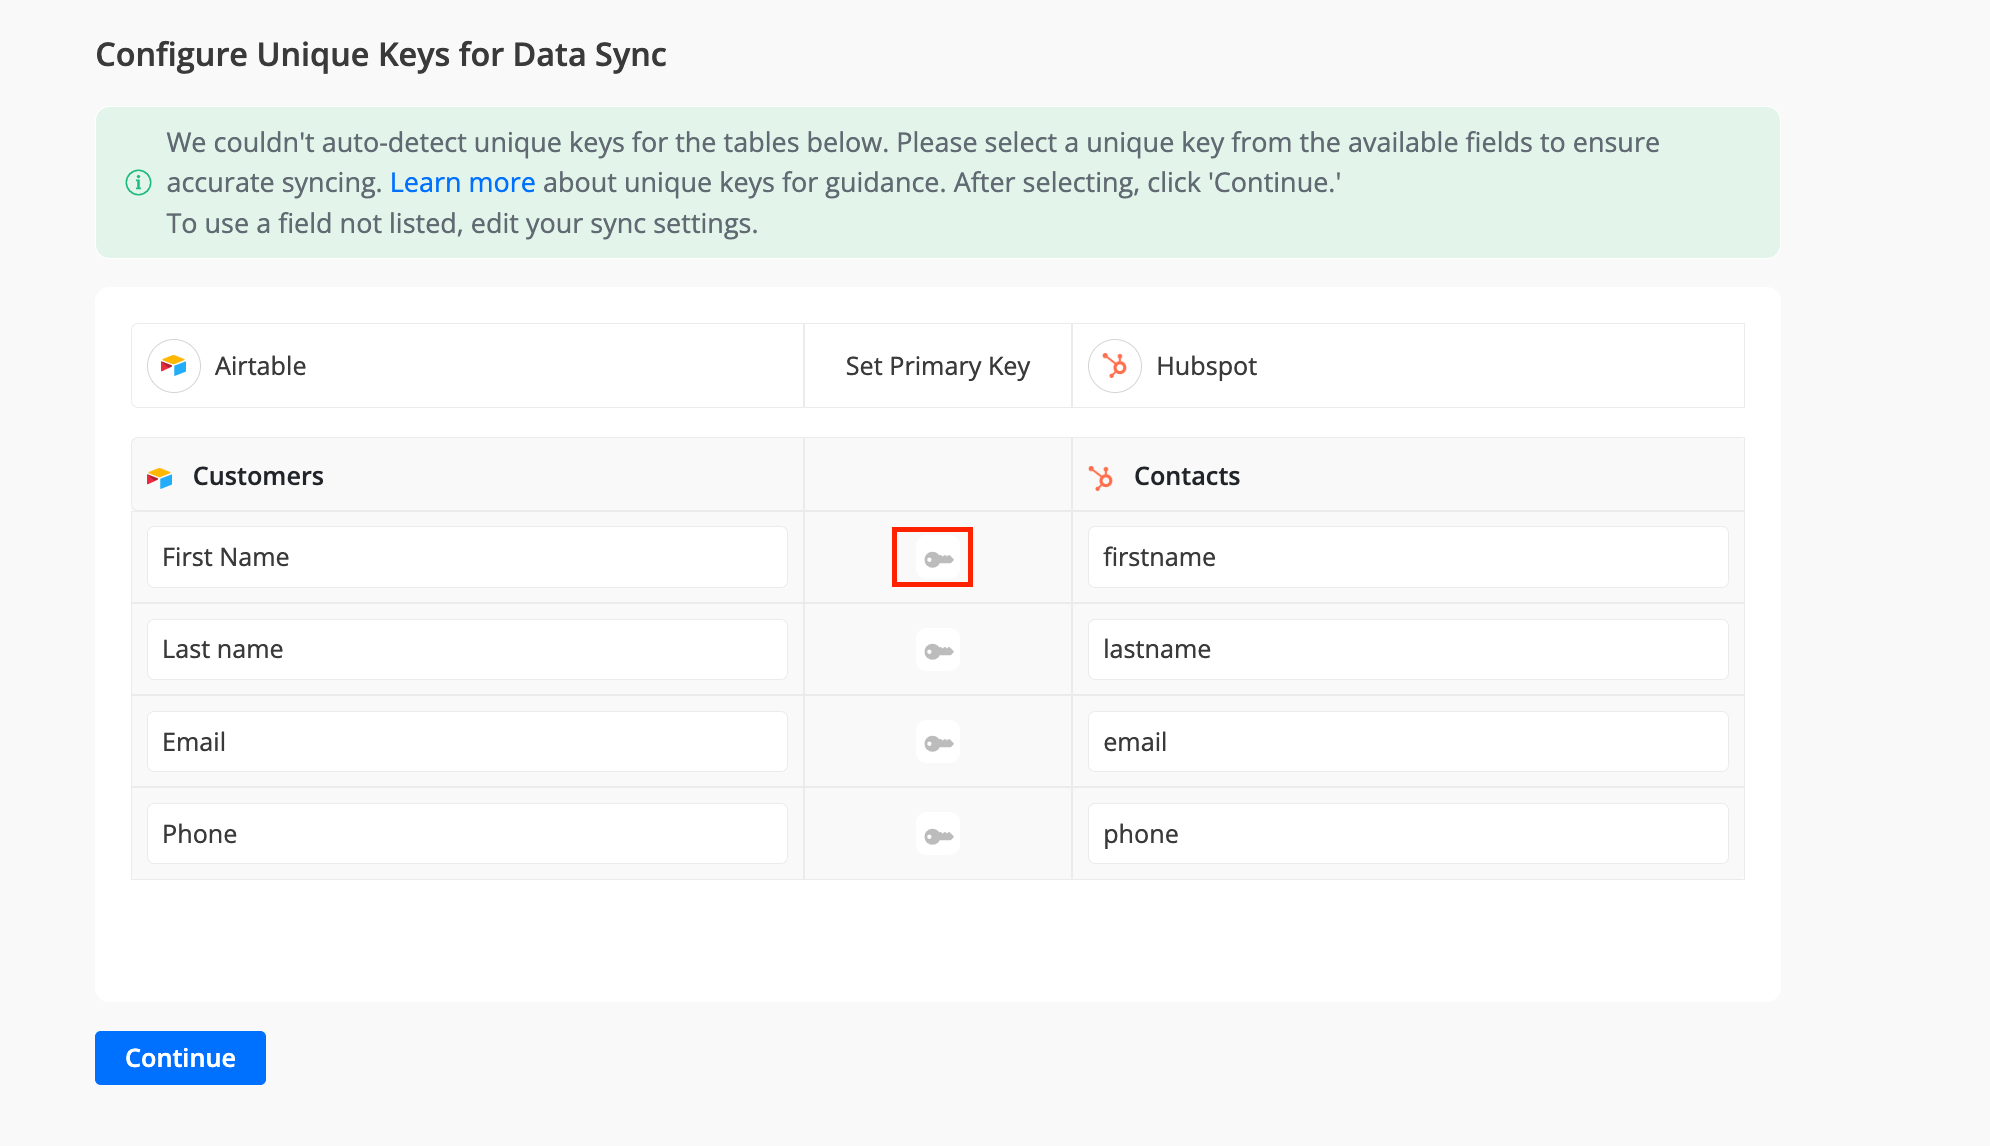
- Click the Continue button, which takes you to the matching key configuration page. On this page, define your matching keys by clicking on the key icons (illustrated in the screenshot)
How to trigger historical sync?
The historical sync is automatically performed when a sync is started. The only exception is if you choose the "Future data only" option, in which case historical sync is skipped. Once a sync is live, our ongoing sync process will keep your data in sync.
If you're planning to change the structure of your tables and want to perform historical sync afterward. You should follow the below steps:
- Stop the sync.
- Make modifications to your table(s) structure.
- Edit the sync for the new table structure.
- Make the sync live, which will perform the historical sync.
Ignoring or Deleting Unmatched Records
Historical sync is a one-way process, allowing you to sync data either from left to right or right to left. If the target app contains more records than the source, these extra records are considered unmatched. You can choose to either leave these records unchanged or delete them.
If your sync includes multiple tables, you can configure this setting individually for each table.
Deleting Unmatched Records
If at least one unmatched record is detected, an option to manage these records appears. To delete the unmatched records:
- Select the "Delete items" radio button.
- Click the "Apply" button.
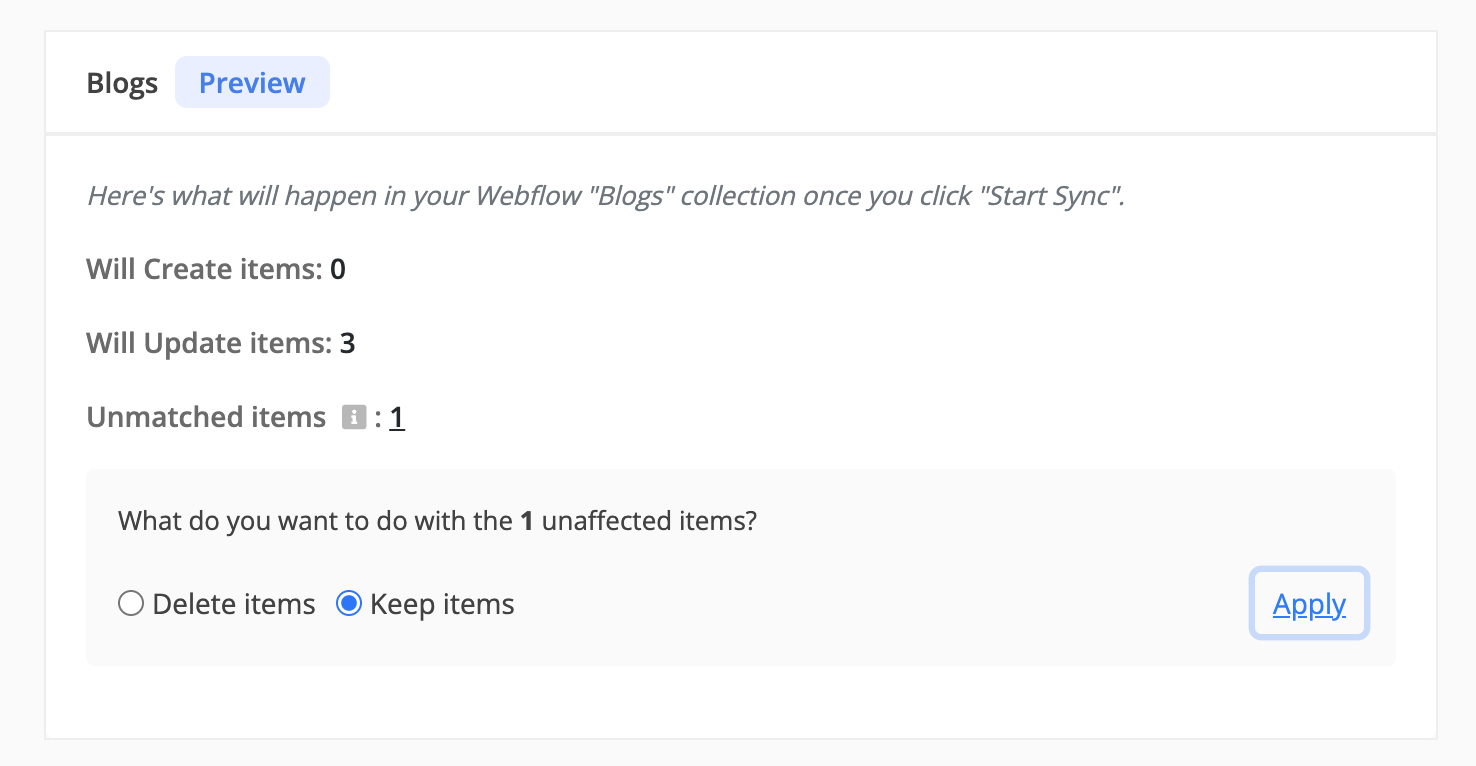
When the historical sync runs, it will automatically remove the unmatched records from the target app.
How Byteline Handles Changes During Historical Sync
Historical sync copies your existing records from one app into the other, in a single direction that you choose. We'll use a common example throughout: a sync that copies records from Airtable into Notion. In this case Airtable is the source (the app being copied from) and Notion is the destination (the app being copied into). The same behavior applies to any pair of apps — for example, HubSpot and Google Sheets.
While this one-time catch-up is running, here's what happens to any new changes people make.
Changes in Airtable (the source) keep syncing
You don't have to stop working. If someone adds or edits a record in Airtable after the historical sync has started, Byteline still picks up that change and syncs it to Notion.
And if you happen to edit the same record that the historical sync is also working through, your most recent change wins. Byteline recognizes that your live edit is newer than the data the historical sync started with, keeps your latest version, and won't create a duplicate.
Changes in Notion (the destination) are paused during historical sync
If you have a two-way sync between Airtable and Notion, changes normally flow in both directions. But while the historical sync from Airtable → Notion is running, Byteline temporarily ignores changes made in Notion (the Notion → Airtable direction is paused).
This is intentional. During the initial catch-up, Byteline is writing a large number of records into Notion. Pausing the Notion → Airtable direction keeps those sync-generated writes from bouncing back and causing conflicts, loops, or duplicate records. Two-way syncing turns back on automatically as soon as the historical sync finishes — you don't need to do anything.
Tip: Because edits made in Notion won't sync back to Airtable until the historical sync completes, it's best to hold off on important changes in Notion (the destination) while the initial sync is running. Make your edits in Airtable, or wait until the sync finishes.
Watch progress and review changes as they happen
You don't need to keep your browser open or wait around — the sync runs on Byteline's servers. While it's working:
- A progress indicator shows how far along the historical sync is.
- Your sync history updates live, so you can review each record as it's created or updated, instead of waiting for a summary at the end.
When the sync reaches 100%, the catch-up is complete: real-time syncing (including Notion → Airtable for two-way syncs) is fully active, and your sync history reflects everything that was processed.
What Happens After Historical Sync
Historical sync is designed to reconcile and align existing data between your connected apps. It establishes record relationships, applies matching rules, and ensures both sides start from a consistent state.
If your sync is configured in Existing Data and Future Changes mode, Byteline automatically transitions from historical sync to ongoing sync once the historical sync completes successfully. No additional action is required.
During ongoing sync, Byteline uses the record relationships established during historical sync to keep your apps up to date with new creates, updates, and deletes. Matching keys are not re-evaluated once the sync is live. You can learn more about how ongoing updates work in the Ongoing Sync (Real-Time & Scheduled Updates) documentation.
If your sync is configured in Existing Data Only mode, the sync stops after historical sync completes and no ongoing updates are applied.
Using historical sync for initial alignment and ongoing sync for continuous updates ensures your connected apps remain consistent over time without repeatedly reprocessing existing data.
Troubleshooting
The record count doesn't match
You have completed the historical sync but subsequently discovered a discrepancy in the record counts between the tables of the two apps. This situation often arises when incorrect unique key(s) are selected. Occasionally, a field designated as a unique key may not be truly unique. To ensure accuracy, you can verify the validity of the unique key(s) by counting the distinct values across all rows. The resulting count should match the total number of rows.
Please note that you have the option to select multiple fields as unique. In such cases, Byteline considers the values of both fields as criteria for matching records (using an AND condition).
