Webflow eCommerce Data Sync

This comprehensive guide walks you through the step-by-step configuration process for syncing Webflow eCommerce data using Byteline.
Supported Data Types
Byteline currently supports syncing the following Webflow eCommerce data objects:
- Products (including SKUs)
- Orders
Syncing Webflow CMS Data
If you're looking to sync data with Webflow CMS (such as blog posts, authors, or other CMS collections), the setup process is different from Webflow eCommerce.
➡️ Please follow the instructions in the Webflow CMS Data Sync for detailed steps.
This guide is specifically focused on syncing Webflow eCommerce data, such as Products and Orders.
Standard Data Sync functionality
Please refer to Data Sync - Getting Started for the standard data sync functionality. The getting started document covers the usage of data sync features valid for all integrations.
Setting up Webflow eCommerce Data Sync with Byteline
Follow these steps to configure data sync for Webflow eCommerce Products using Byteline. You can follow a similar process to sync Webflow eCommerce Orders.
Step 1: Start the Sync Setup
- Log in to your Byteline account and navigate to the My Syncs page.
- Click on the "Create Sync" button to begin the configuration.
Step 2: Select Webflow as Your First App
- Choose Webflow as the first app to sync.
Alternatively, you can select another app first and then pick Webflow as the second app. - Click on the "Sign In" button, if not already connected, under Webflow to connect it to Byteline.
- Now select the eCommerce - Product for the data type to sync.
- Select the site for which the data needs to be synced.
Step 3: Connect the Second App
- Select the second app for syncing and log in to authorize the connection.
- Once connected, click "Continue" to move to the table mapping screen.
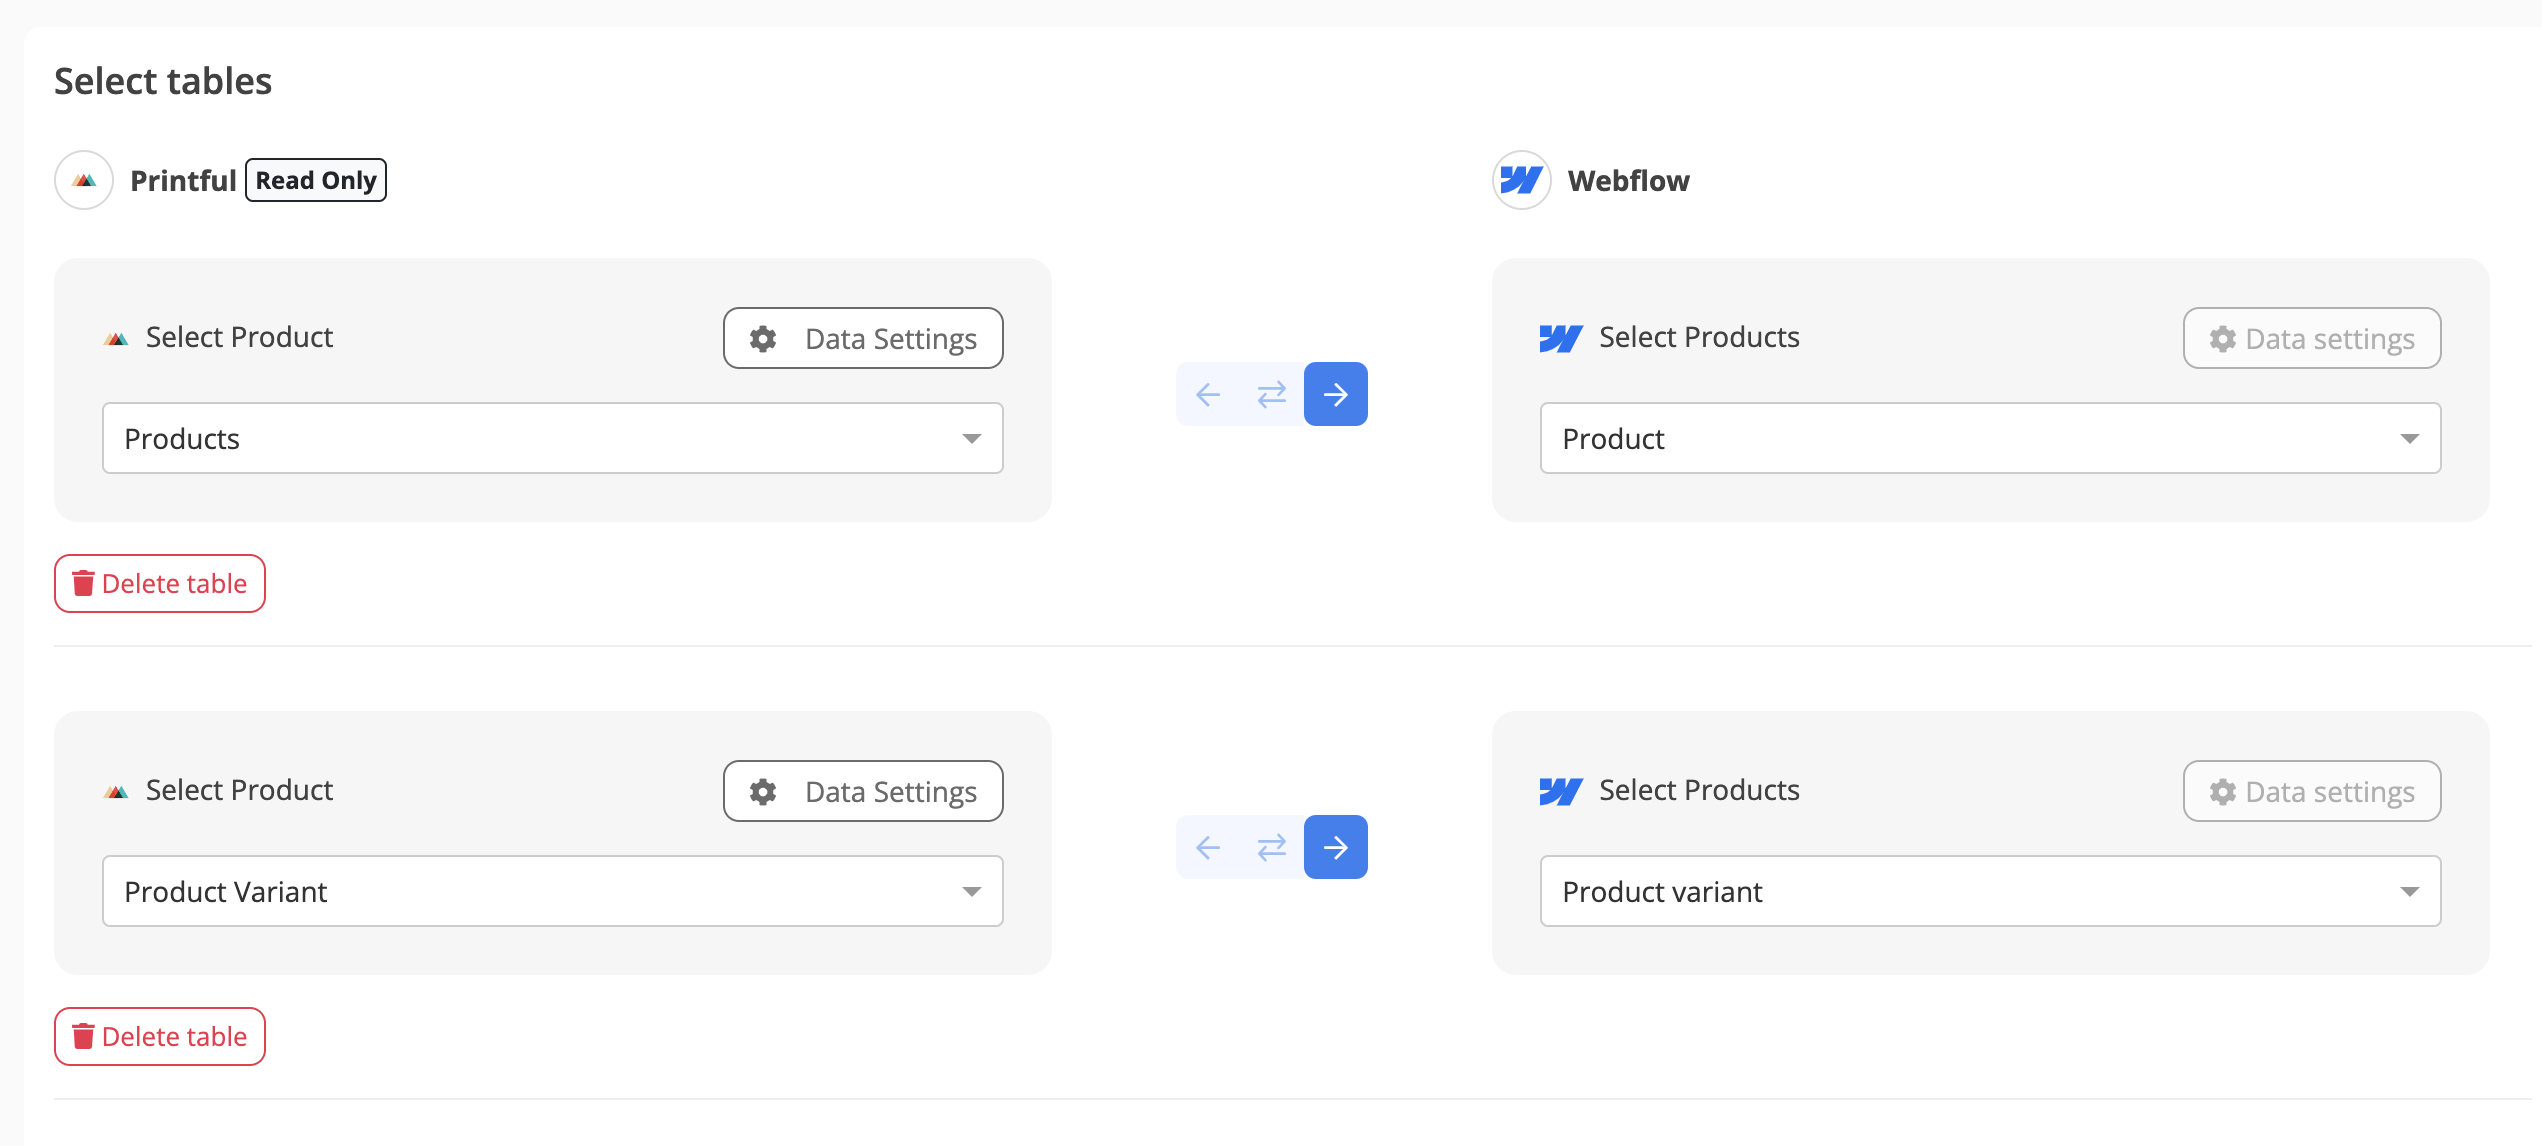
Step 4: Map Tables Between Webflow eCommerce and the Other App
Note: In the instructions below, Webflow is configured as the right-side app in the sync setup.
This means you’ll be mapping fields from the other app (left side) to the corresponding fields in Webflow eCommerce (right side).
- Select the tables you want to sync between the two apps.
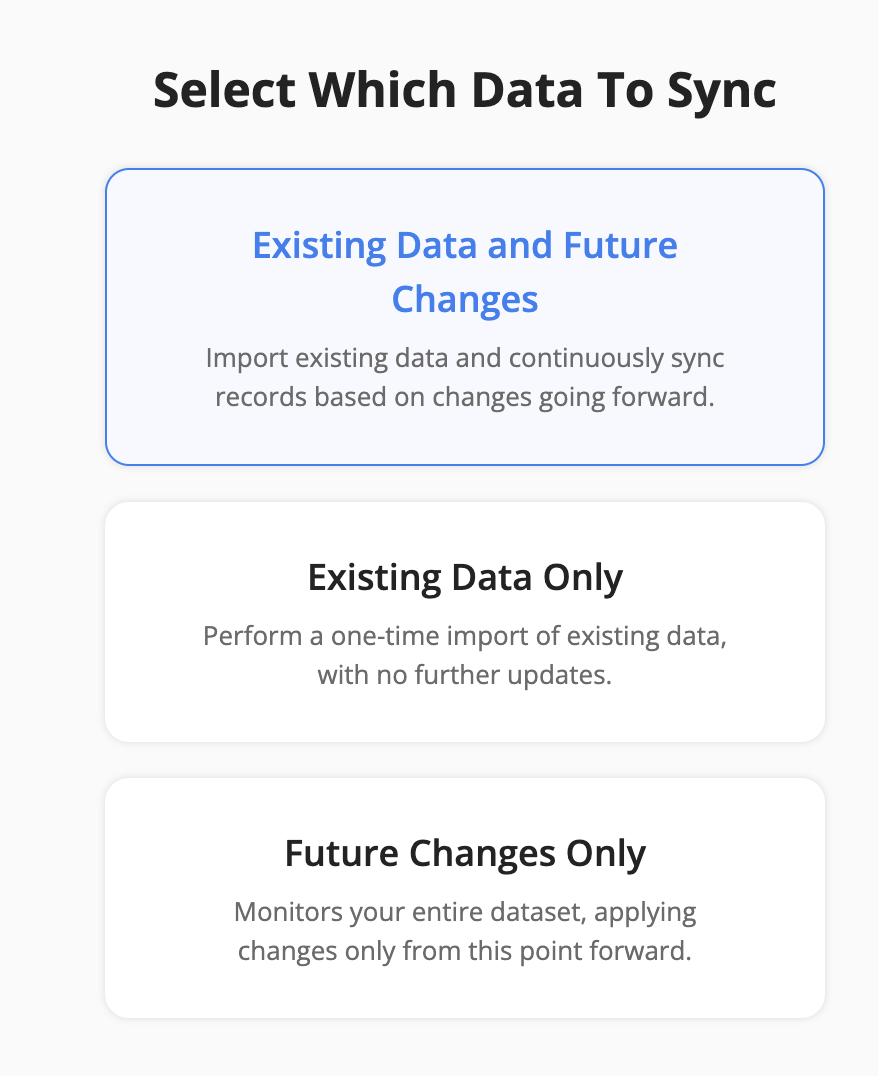
Step 5: Choose Which Data to Sync
For each sync, you'll need to select whether to sync existing records, future changes, or both.
- Products:
Choose "Existing Data and Future Changes" to sync all current product data to Webflow, along with any future updates.
If products already exist in Webflow, Byteline will only sync the differences, avoiding duplicate entries. - Orders:
Typically, select "Future Changes Only" so that new orders are synced to your connected app as they are placed.
Step 6: Configure Field Mapping
- On the Field Mapping screen, drag and drop fields from the right panel into the mapped fields column to create mappings.

- To delete a mapping, click the X button next to the field.
- Select the sync direction at the field level using the arrow buttons.
One-Way Sync: Data flows from one app to the other.
Two-Way Sync: Data flows bidirectionally between both apps. - Once your mappings are finalized, click "Continue.
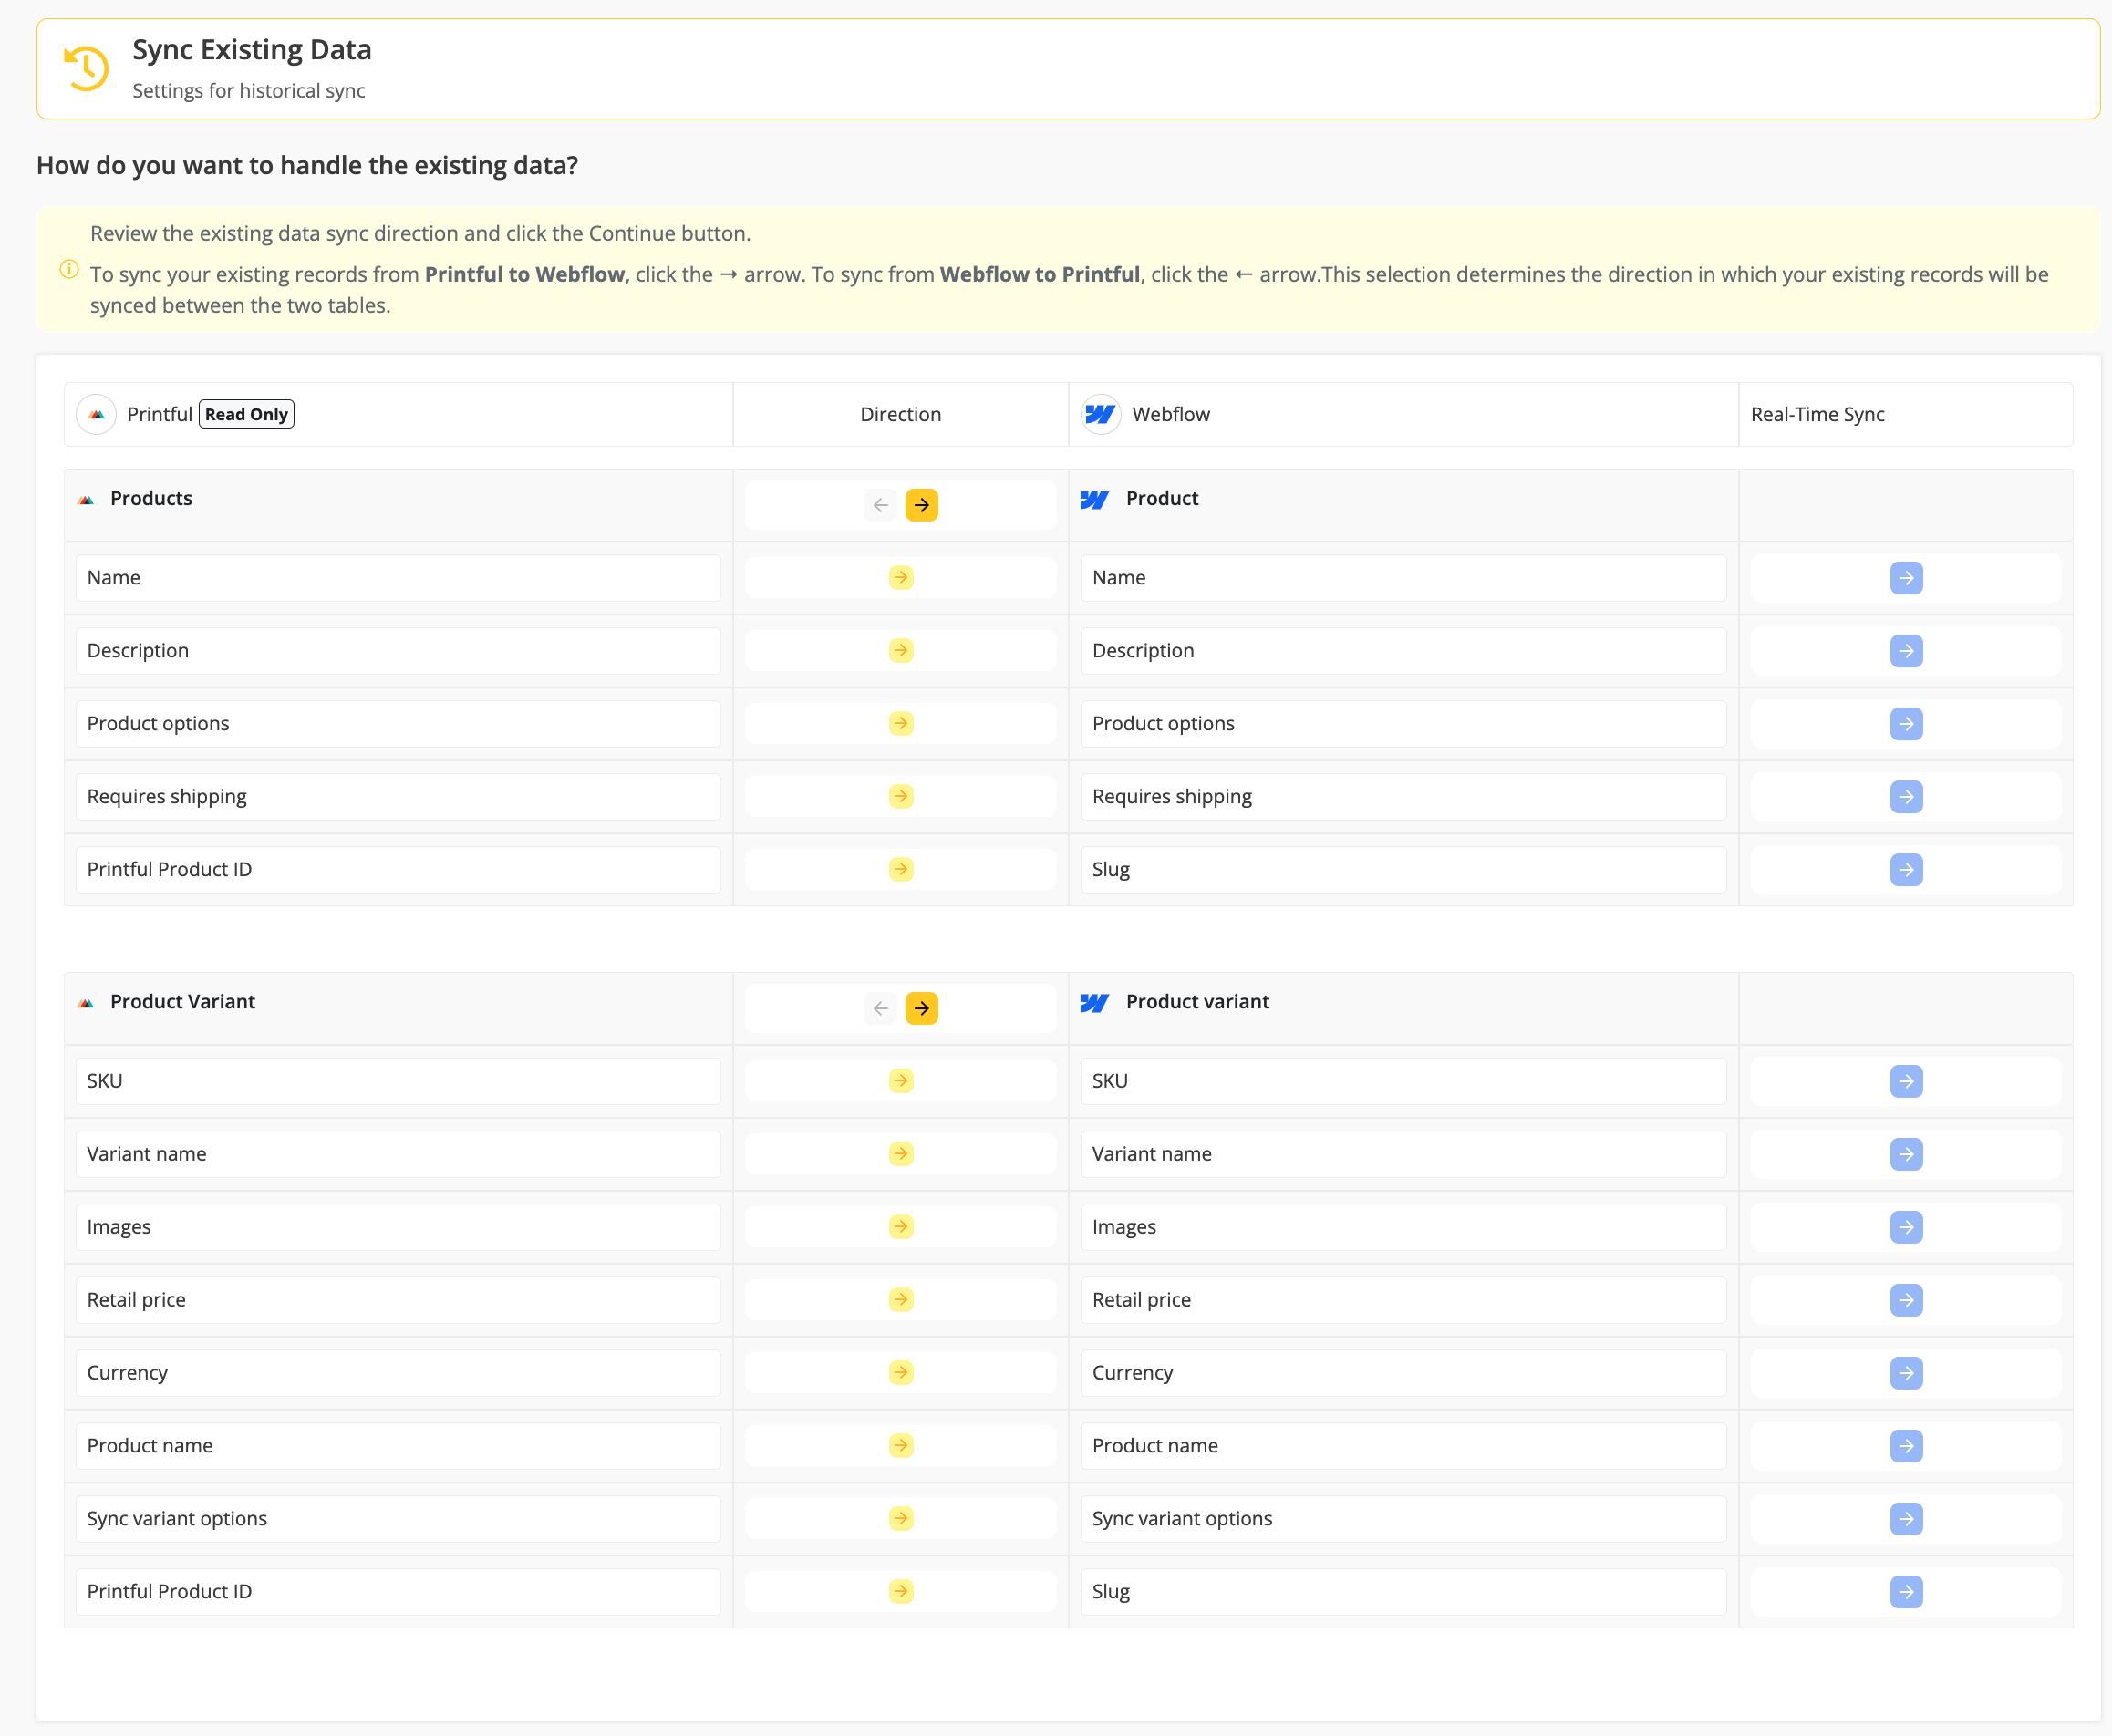
Step 7: Sync Existing Data Configuration
Select the sync direction for your existing data.
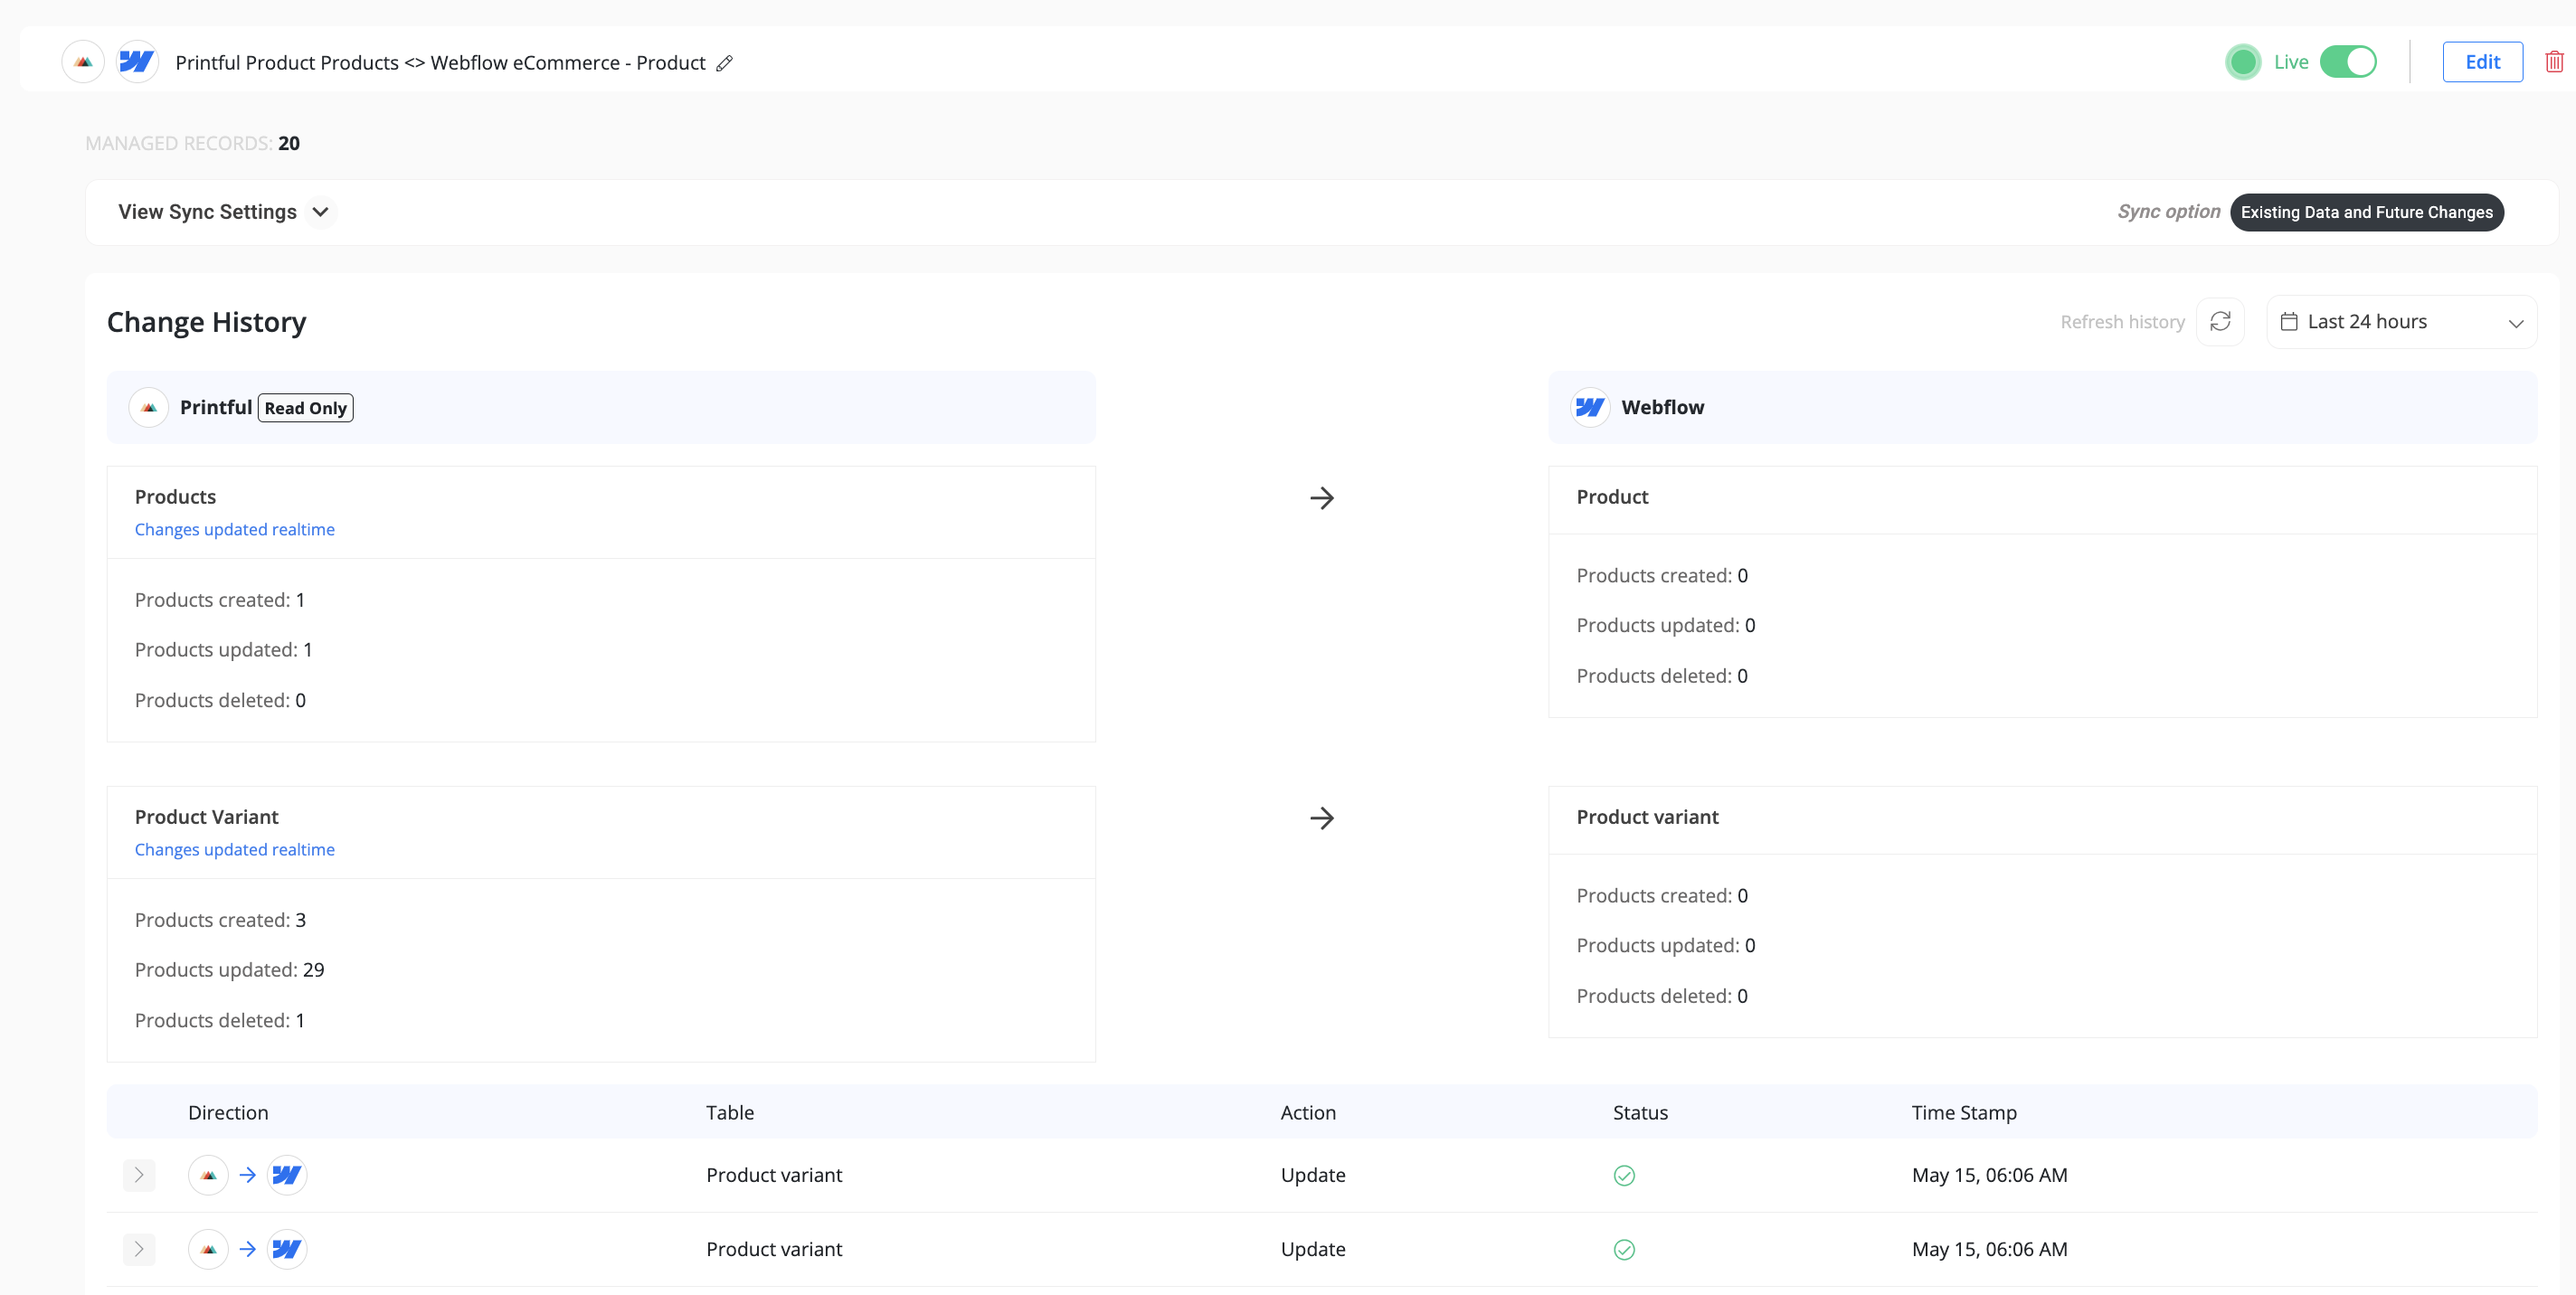
Step 8: Review Sync Preview
- Preview the sync setup to ensure everything is configured correctly.
- If all looks good, click "Start Sync."
- Byteline will sync your existing data and make the sync live.
Additional Configuration
Products That Do Not Require Shipping
When syncing products to Webflow eCommerce, you must configure the Requires Shipping field appropriately.
- If this field is not mapped, Webflow will assume the product requires shipping.
- To ensure that products like digital goods or services do not require shipping, you must explicitly map the
Requires Shippingfield and set its value tofalse.
This is important to avoid shipping-related issues for non-physical products.
Webflow’s 50-Variant Limit
Webflow enforces a strict limit of 50 variants per product. This is a platform-level restriction and cannot be overridden by Byteline.
A product’s total variants are calculated by multiplying all option values. For example:
- 3 sizes × 10 colors = 30 variants → Allowed
- 6 sizes × 10 colors = 60 variants → Rejected by Webflow
If a product exceeds 50 variants, Webflow will not allow it to be created or updated, and the sync will fail.
Recommendation: Before syncing multi-variant products to Webflow, ensure the total number of variants in the paired app, such as Printful, does not exceed 50. If necessary, reduce the number of sizes, colors, or other option values in your source product to comply with Webflow’s limitation.
Troubleshooting Webflow eCommerce Products
Product not found while adding variants
Error: Product not found. This can sometimes happen if the data sync ran into an issue while adding the product.
This error can occur while syncing product variants to Webflow when the parent product was not successfully created during an earlier sync.
Because variants are always linked to a product, Webflow cannot accept a variant unless its product already exists. If the product failed to sync, any attempt to add or update its variants will result in this error.
Why this happens
- The data sync encountered an error while creating the Webflow Product
- The product record is missing in Webflow
- Variants tried to sync before the product was successfully added - FIX
How to resolve the issue
Follow these steps to fix the problem in the correct order.
1. Find products that failed to sync
Use the Record Change History to identify product-level errors.
Apply the following filters:
- Destination Table:
Webflow Product - Status:
Error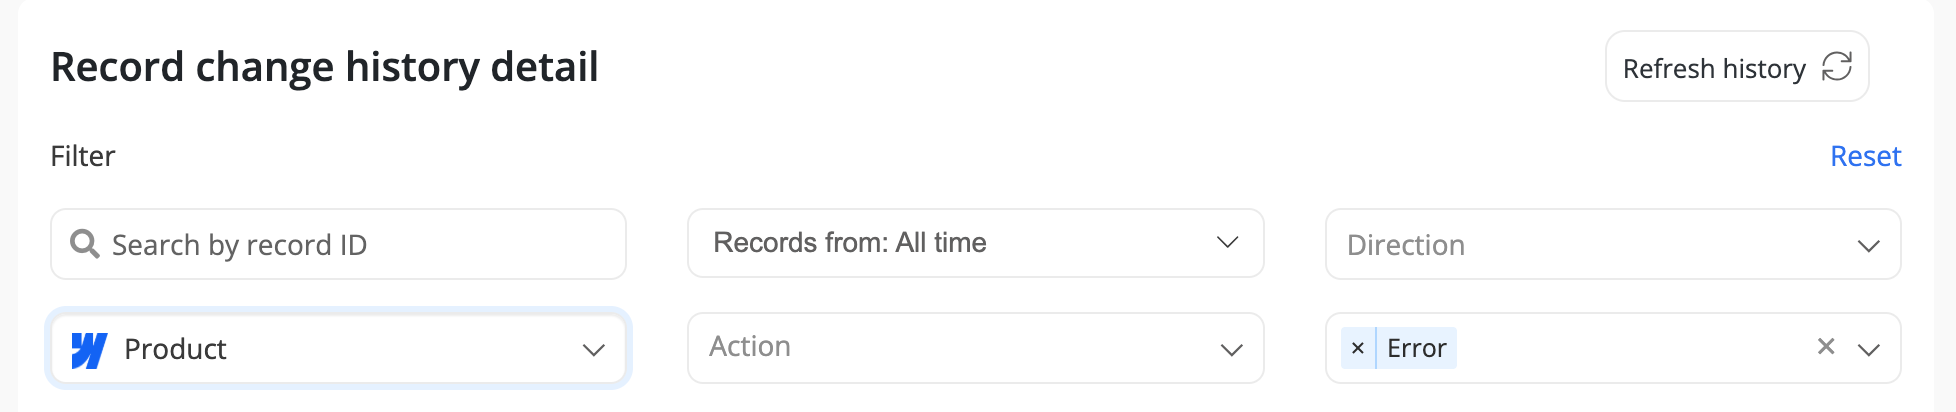
This will show all product records that failed to sync to Webflow.
2. Fix the product sync error
- Open each failed product record
- Review the error reason
- Fix the underlying issue (for example: missing required fields, invalid values, or configuration issues)
- Resync the product so it is successfully created in Webflow
⚠️ Variants cannot be added until the product exists in Webflow.
3. Resync the product variants
Once the product is successfully synced:
- Go back to the variant record(s)
- Run Resync on the variant
The variant sync should now succeed since the product is available.
Key takeaway
Always resolve product-level errors first. Variant errors like “Product not found” are usually a downstream effect of a failed product sync.
If you continue to see issues after resyncing the product, please reach out to Byteline support with the error details.
Product variant shows quantity 0 in Webflow
When syncing products to Webflow eCommerce, some product variants may appear in Webflow with Quantity set to 0.
This usually means the variant is unavailable in the source app. Byteline translates unavailable product variants into Webflow by setting their inventory quantity to 0.
For example, if you sync a product from Printful and a specific size, such as XS, is not available for that product, the matching Webflow variant is synced with quantity 0.
This is expected behavior. In Webflow eCommerce, unavailable variants are represented as out of stock by setting the quantity to 0.
Why this happens
- The variant exists as part of the product option combination.
- The matching variant is unavailable in the source app.
- Byteline syncs this unavailability to Webflow by setting the variant quantity to
0.
Key takeaway
A Webflow quantity of 0 does not always mean the sync failed. It can simply mean the variant is unavailable in the source app, and Byteline has correctly synced that unavailability to Webflow.